
Guide
How to add a custom text field to a WooCommerce product
WooCommerce has no custom text field on the product page out of the box. A shop that sells engraved rings, name mugs or printed shirts needs one, so the customer can type what goes on the product. There are three ways to add it, and they differ less in the field itself than in what happens after the customer presses Add to cart.
The three ways
| Add-ons plugin | Code snippet | Personalizer | |
|---|---|---|---|
| Text field on the product page | Yes | Yes | Yes |
| Customer sees the text on the product | In some paid versions | No | Yes, as they type |
| Text saved on the order | Yes | Yes | Yes |
| Print file with the order | No | No | Yes |
| Extra fields (dates, choices, uploads) | Many | What you write | Focused on text and artwork |
| Cost | Free to about 70 a year | Free | Free, Pro for own text |
1. A product add-ons plugin
This is the usual answer, and for many shops the right one. A product add-ons plugin adds a form to the product page: text fields, dropdowns, checkboxes, date pickers, sometimes file uploads, each with an optional extra charge.
The free ones are good. Advanced Product Fields for WooCommerce has a text field, a text area, conditional logic and a flat extra fee in its free version, and runs on more than 50,000 shops. PPOM is similar and on more than 20,000. WooCommerce’s own Product Add-Ons extension is paid, around 69 a year, and adds short and long text, file upload, a customer-defined price and a date picker.
Setting one up takes a few minutes with any of them:
- Install the plugin and open its field groups screen.
- Add a text field. Give it a clear label, such as “Name to engrave”, and a character limit.
- Make it required if the product cannot be made without it.
- Add a price if the personalization costs extra.
- Assign the group to the products or categories that need it.
What you get is text stored on the order line. What the free versions do not give you is a picture of the result, and none of them lists a print-ready file. The customer types “Grandma Ana” into a box and has to imagine how it will look, and when the order comes in someone at the shop sets the lettering by hand before it can be printed or engraved.
2. A few lines of code
If you need one text field and nothing else, you do not need a plugin. These five hooks show the field, refuse an empty one, carry it through the cart and save it on the order. Put them in a code snippets plugin or your child theme’s functions.php:
// Show the field above Add to cart.
add_action( 'woocommerce_before_add_to_cart_button', function () {
	echo '<p class="form-row"><label for="custom_name">Name to print</label> ';
	echo '<input type="text" id="custom_name" name="custom_name" maxlength="20"></p>';
} );
// Refuse an empty name.
add_filter( 'woocommerce_add_to_cart_validation', function ( $passed ) {
	if ( empty( $_POST['custom_name'] ) ) {
		wc_add_notice( 'Please enter the name to print.', 'error' );
		return false;
	}
	return $passed;
} );
// Keep it with the cart item.
add_filter( 'woocommerce_add_cart_item_data', function ( $data ) {
	if ( ! empty( $_POST['custom_name'] ) ) {
		$data['custom_name'] = sanitize_text_field( wp_unslash( $_POST['custom_name'] ) );
	}
	return $data;
} );
// Show it in the cart and at checkout.
add_filter( 'woocommerce_get_item_data', function ( $items, $cart_item ) {
	if ( isset( $cart_item['custom_name'] ) ) {
		$items[] = array( 'name' => 'Name', 'value' => $cart_item['custom_name'] );
	}
	return $items;
}, 10, 2 );
// Save it on the order.
add_action( 'woocommerce_checkout_create_order_line_item', function ( $item, $key, $values ) {
	if ( isset( $values['custom_name'] ) ) {
		$item->add_meta_data( 'Name', $values['custom_name'] );
	}
}, 10, 3 );
As written, the field appears on every product. To limit it to some, wrap the first two functions in a check such as has_term( 'personalised', 'product_cat' ). Test it with your own theme: a product page built from blocks renders the add-to-cart form differently in some themes, and the first hook has to fire for the field to show.
The result is the same as with an add-ons plugin: text on the order, no preview, lettering set by hand.
3. A personalizer that shows the text on the product
The first two ways collect the text. A personalizer also draws it. The customer types a name and sees it on a photograph of the product, in the font and the place it will be printed, and the order arrives with a print-ready file rather than a word to retype.
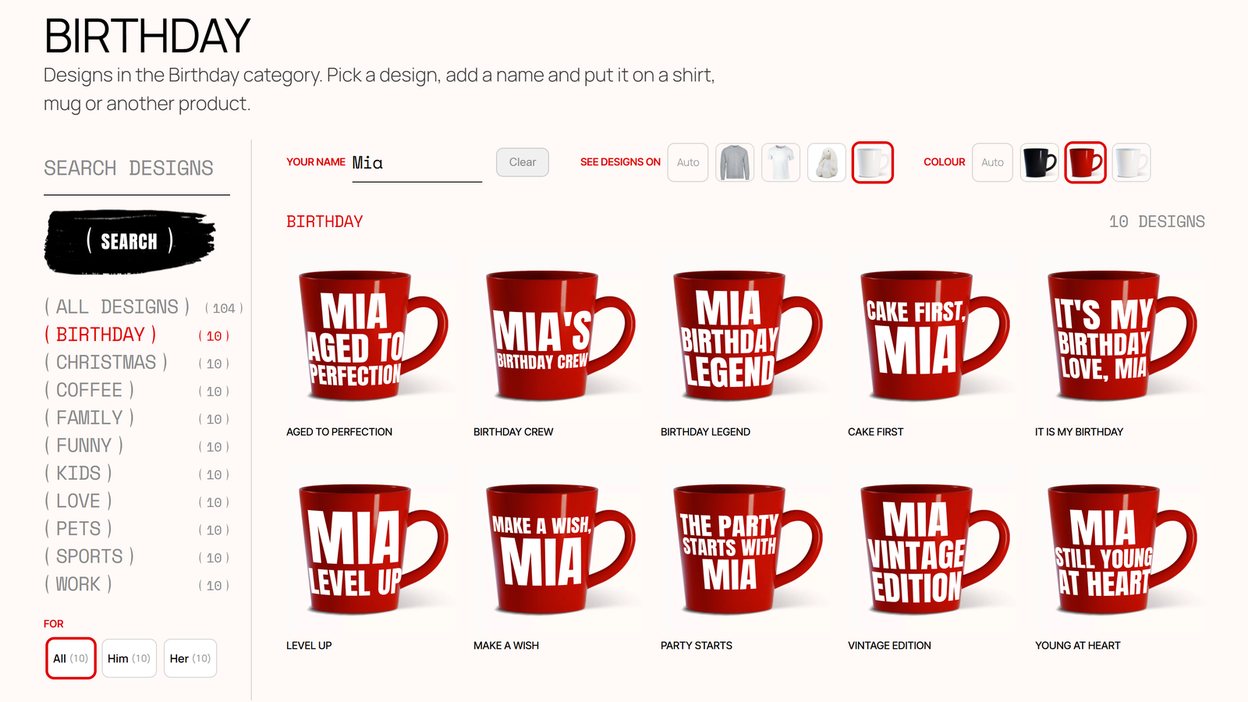
That matters most when the text is the product: a name mug, a jersey with a surname, an engraved watch. A preview removes the doubt that stops people buying, and the file removes the hand work that makes personalization expensive to fulfil.
Pomp Product Personalizer works this way. In the free plugin the customer picks one of your designs, types their name into it, and sees it on the product they choose. Pro adds a plain custom text field on the product’s own page, right above Add to cart, with the same live preview on the product photo. Either way the order carries an SVG or a PDF with the text converted to vector outlines, in the shape of the print area.
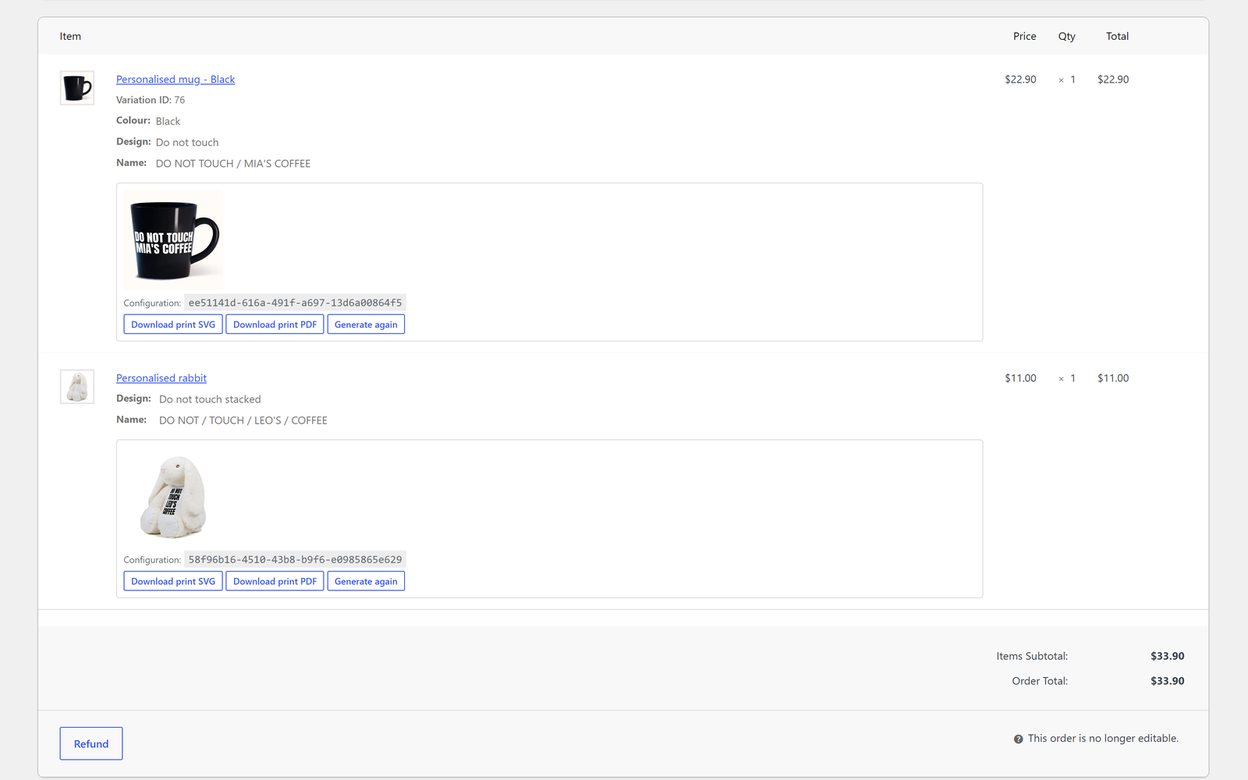
Which one to pick. If the text is a note that only you read, such as a gift message or a monogram you set by hand anyway, an add-ons plugin or the snippet is enough. If the text is printed or engraved and the customer is paying for how it looks, show it to them before they buy.
For the broader question of putting a customer’s name on a product, and what a print-ready file has to be, see how to let customers put their own name on a product.